React Server Component의 등장 배경
웹은 클라이언트 사이드로 유저에게 보여질지 서버사이드로 유저에게 보여질지 선택하여 개발할 수 있습니다. 각자 장단점이 있으며 현재는 Server-Side-Rendering이 유행하고 있습니다.
서버사이드는 왜 유행일까요? 그리고 다음 스텝은 무엇일지 생각해볼 필요가 있습니다.
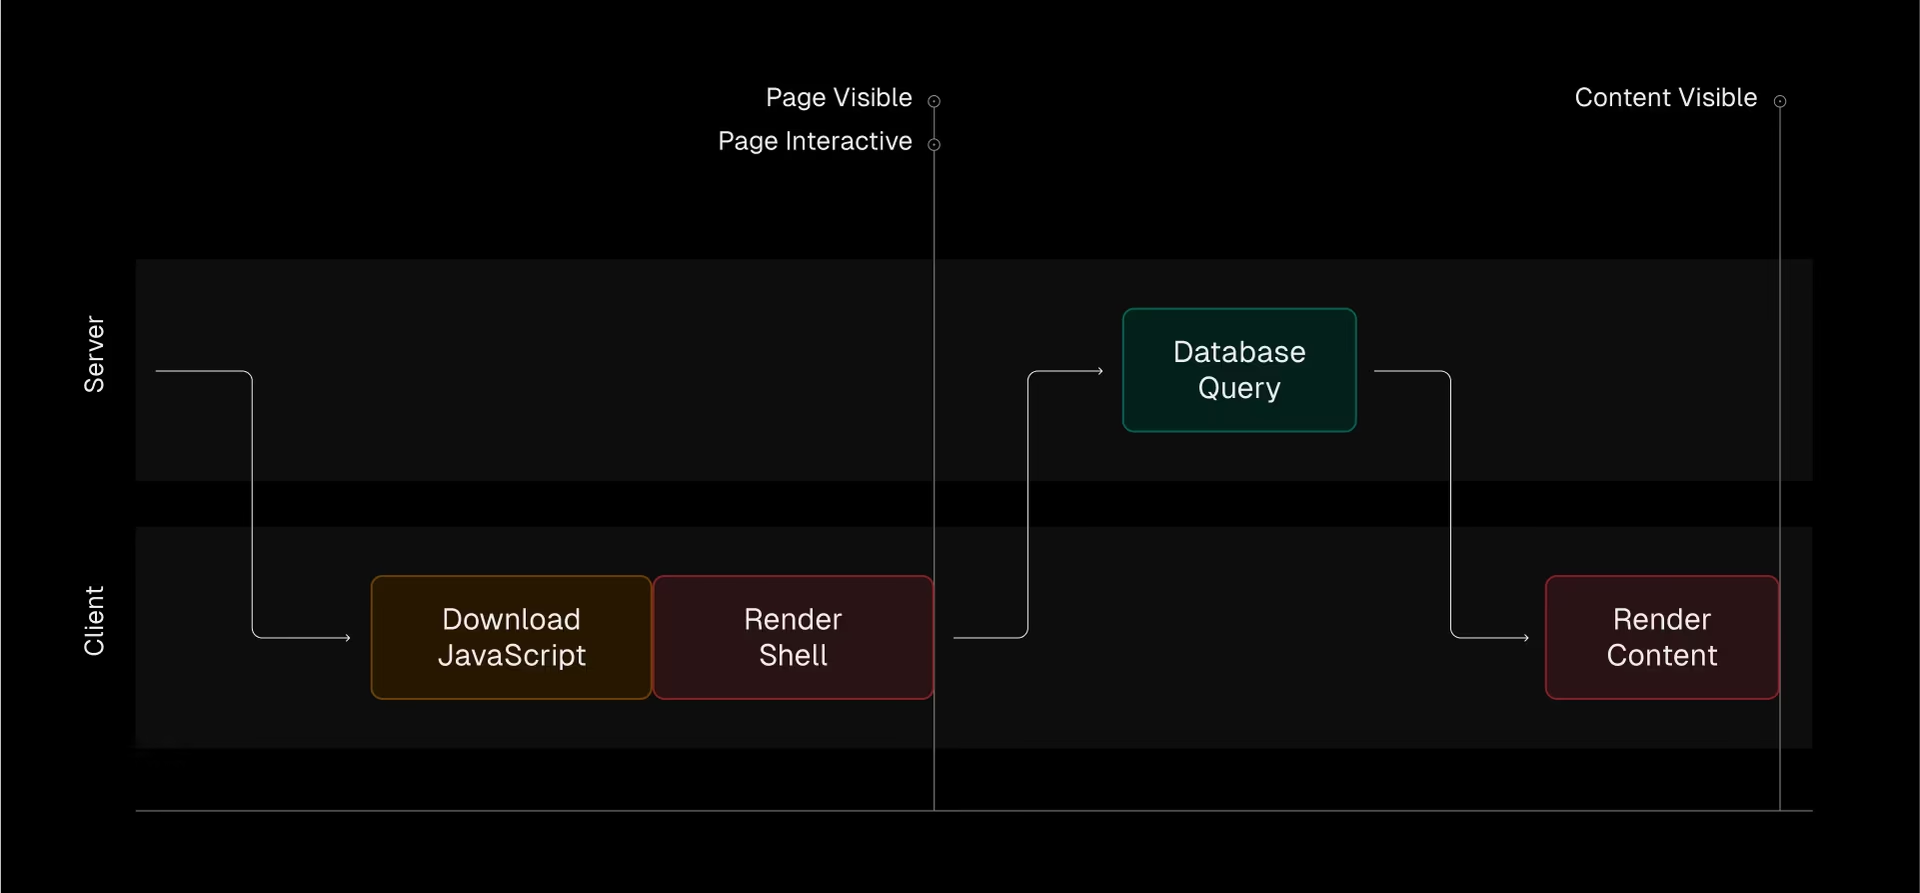
Client-Side-Rendering
출처 : https://vercel.com/blog/whats-new-in-react-19
CSR같은 경우는 모든 JS번들을 다운로드 해야하기때문에 First Paint가 느립니다.
query같은 경우도 따로 해야하니 빠르다고하기에는 애매한 감이 있습니다.
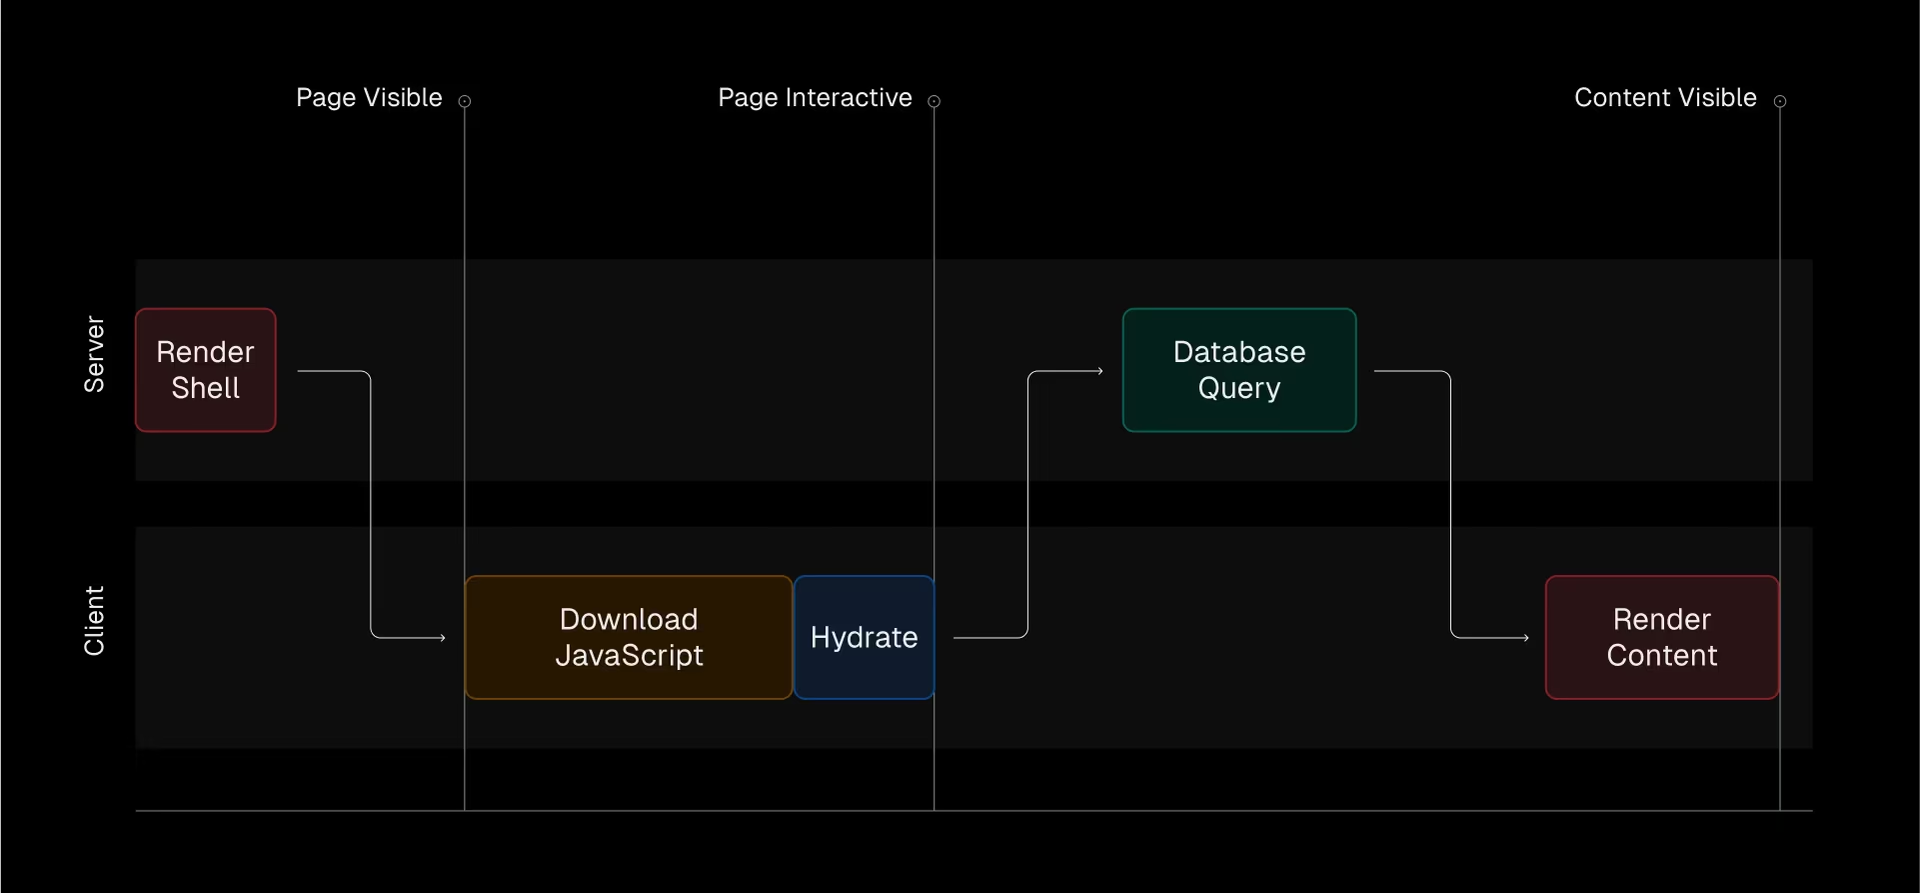
Server-Side-Rendering
출처 : https://vercel.com/blog/whats-new-in-react-19
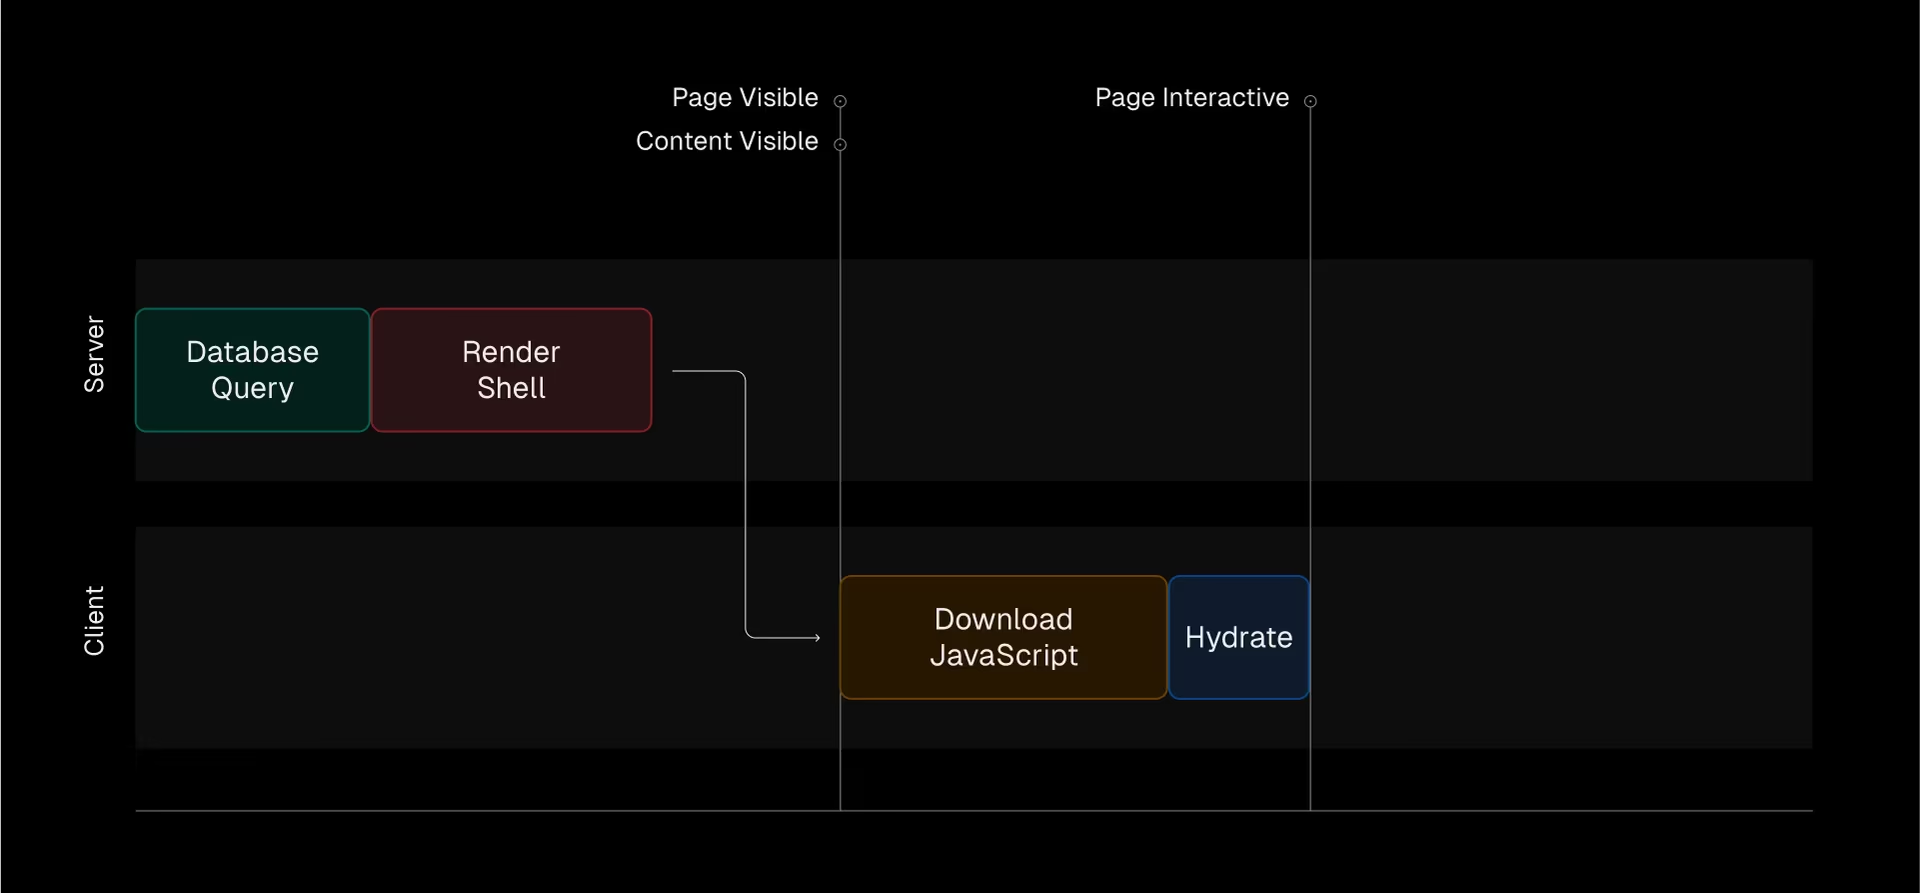
Next의 SSR의 경우 First Paint가 빠릅니다. 그 이유는 HTML을 먼저 유저에게 보여주어 화면을 최대한 빨리 보여주기 위해서입니다. 그래서 hydration이라는 개념이 등장하게됩니다.
💡 Hydration 식물에 물주듯이 HTML에 JS를 부여하여 생명을 부여한다는 의미입니다. 해당 과정이 진행되며 Page Interaction이 가능해집니다. 만약 hydration이 늦어질 경우 문제가 생길 수 있습니다.(물론 요즘 웹 성능으로는 그런일이 드물긴하지만,,,)
First Paint를 HTML만으로 이루어져 빠르기 때문에 CSR보다 좋아보입니다. 하지만 아직 문제가 있습니다. query는 여전히 늦습니다. 데이터 쿼리가 조금 늦어지는게 뭐 어떠냐는 생각이 들 수도 있습니다. 하지만 아래의 그림을 보면 유저에게 API데이터를 곧바로 보여줘야하는 경우에 문제가 생깁니다.
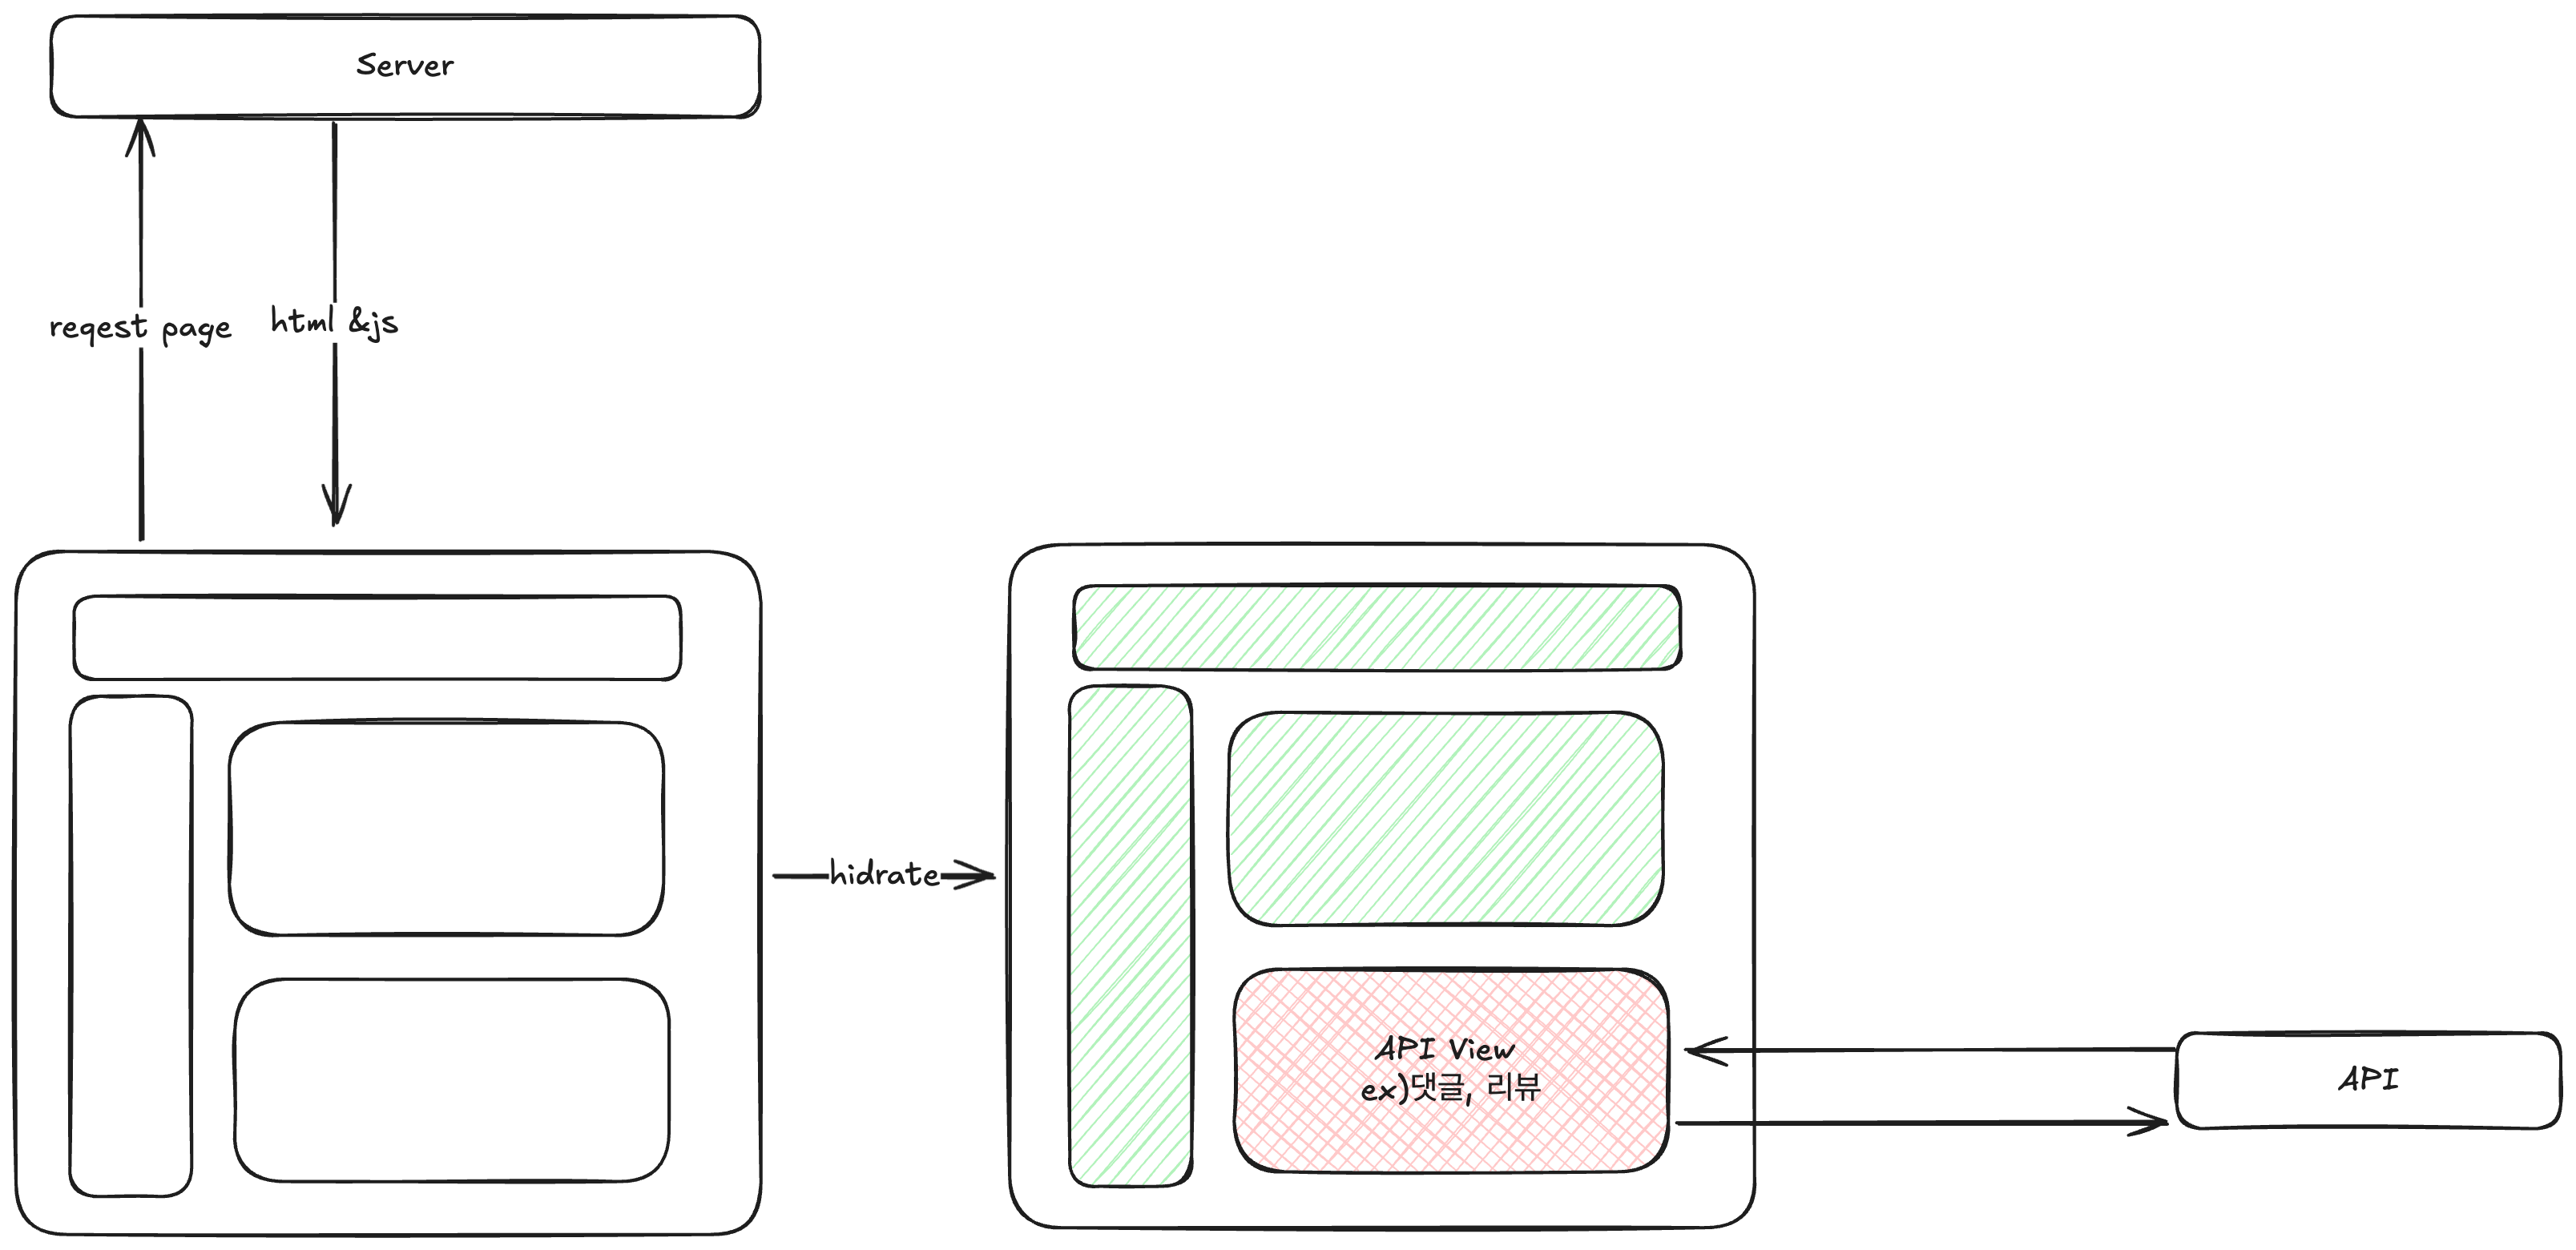
- 물론 Suspence를 사용한다면 API View 부분을 지연시켜 로딩으로 처리할 수 있습니다.
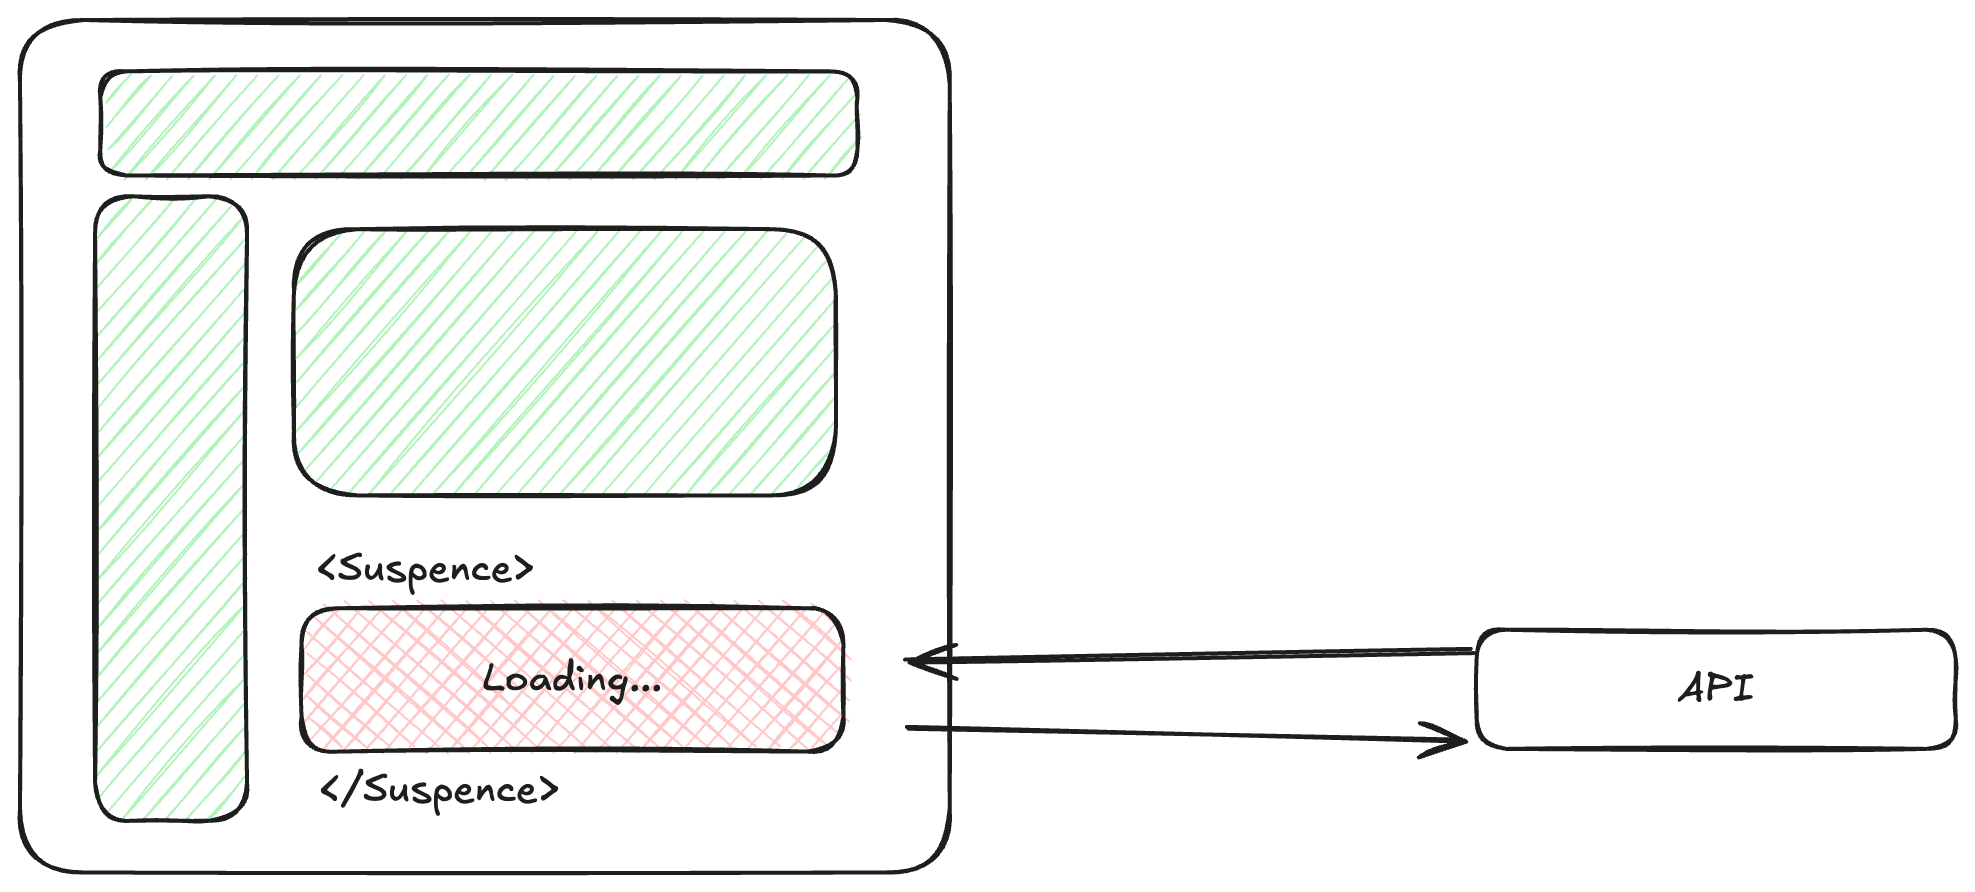
- hidrate 이전부터 유저에게 loading을 보여주지 않으니 조금 부족한 감이 있습니다. 해당 문제는 lazy를 통해 해결합니다.
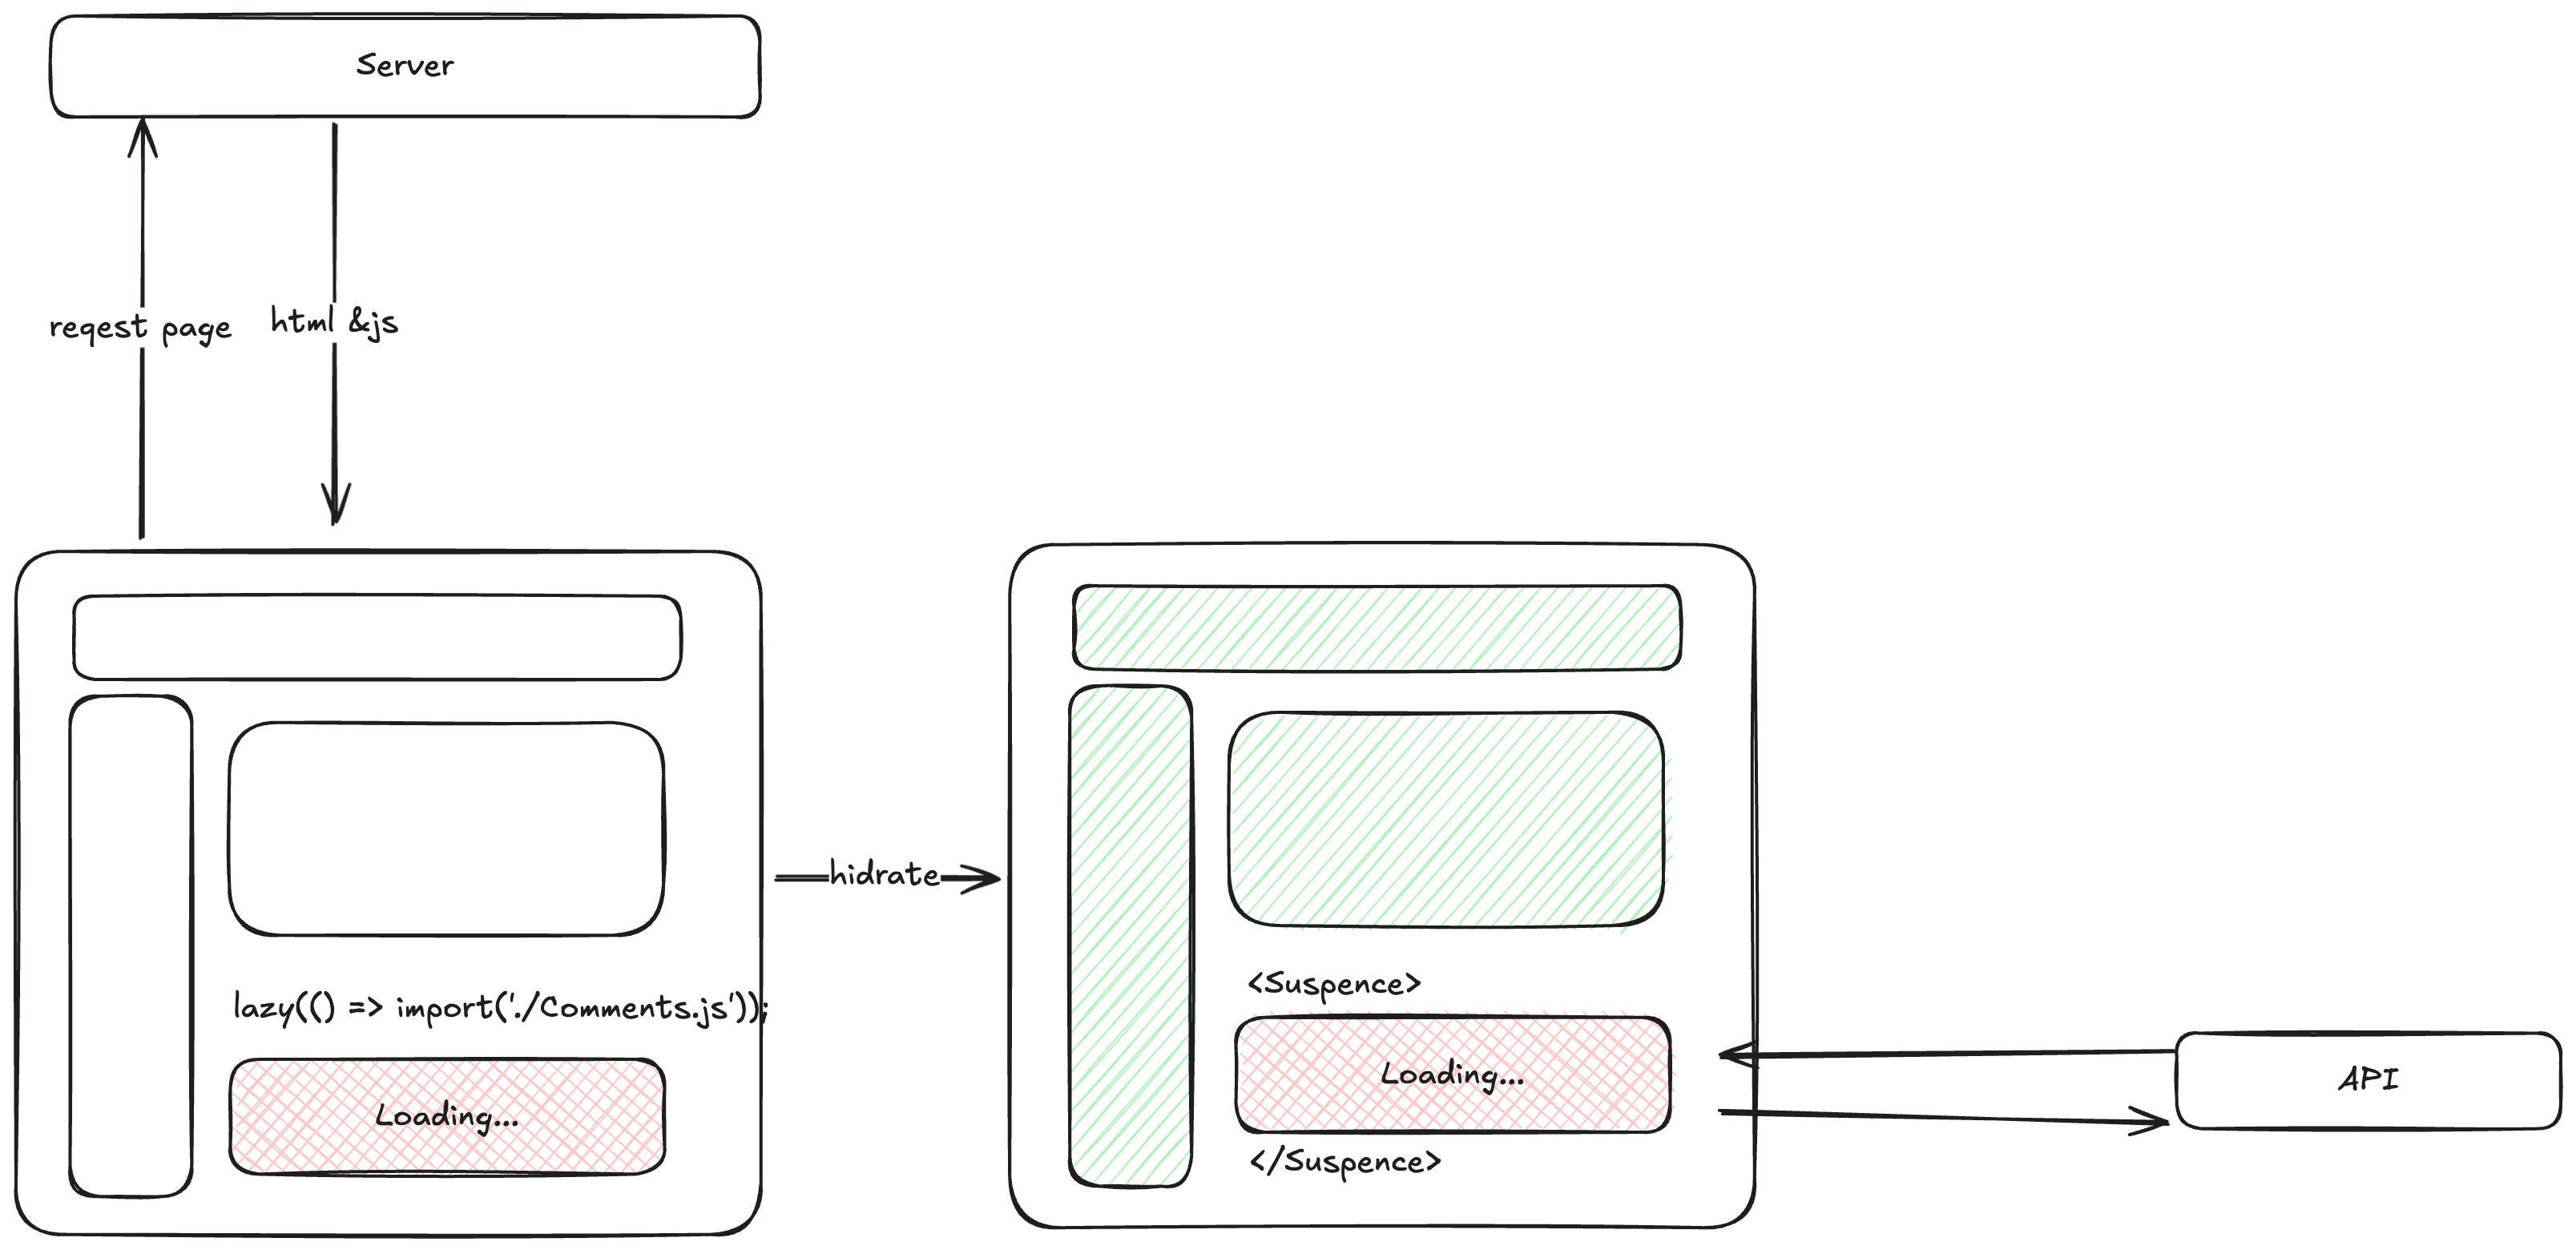
- lazy를 사용할 경우 daynamic import를 사용하기 때문에 런타임 중에서 컴포넌트를 불러옵니다. 즉 Server에서 받는 html & js 에서 제외됩니다.
- lazy와 Suspence를 함께 사용한다면 페이지의 다른 요소에 영향을 주지 않고 개별적으로 로딩할 수 있습니다. 하지만 이게 완벽한 것이라고 한다면 아닙니다.
React Server Component(RSC)
일종의 SSR이지만 기존과 다른점은 Component 단위로 서버사이드개념이라는 점입니다.
출처 : https://vercel.com/blog/whats-new-in-react-19
RSC같은 경우 기존의 SSR의 문제를 해결해버립니다. 바로 query호출과 Render를 동시에 하여 first Paint와 Content Paint를 동시에 해결해 버립니다.
query와 Render가 동시에 가능한 이유
RSC : ReactServerComponent
RSC는 ServerSide Component입니다. 컴포넌트 단위로 서버렌더링을 합니다.

ServerSide Component 개념을 가능하게 하는 원리는 다음과 같습니다.
- React Comopnent를 서버에서 완성
- 완성된 React Component를 바이너리데이터로 encode
- 클라이언트에서 RSC Paser를 통해 컴포넌트 decode
즉 컴포넌트를 서버에서 완성하기 때문에 클라이언트에서 api 즉 query를 할 필요가 없고 render도 할 필요가 없어집니다.
이것이 가능하게 된 이유는 React Server Component에 있습니다.
리액트 컴포넌트를 만드는 방법
리액트 컴포넌트란?
리액트 컴포넌트는 JS Object를 ReactCreateElement 메소드를 사용하여 만든 결과물입니다.
const element = {
  type: "div",
  props: {
    children: async () => "hello",
  },
};

ReactCreateElement(element);
결과물은 아래의 코드와 같습니다.
<div>hello</div>생각보다 컴포넌트의 기준은 굉장히 단순합니다.
type: "div"; // div 태그 컴포넌트
type: "span"; // span 태그 컴포넌트
type: "p"; // p 태그 컴포넌트
type: () => ""; // 함수형 컴포넌트
리액트 서버 컴포넌트(RSC)는 다음과 같습니다.
type: async () => "";서버 컴포넌트를 선언하는 기준은 함수형 컴포넌트에 async를 붙이는 것입니다.
이것은 서버 컴포넌트라는 것을 공표하는 행동입니다. 그럼 공표하게 된다면 어떤 부분의 변화가 생길까요?
Client Component의 동작
async를 사용하지 않는 기존의 방식의 컴포넌트를 Client Component라고 합니다.
NextJS에서 CSR로 구현하면 어떤 일이 생길까요?
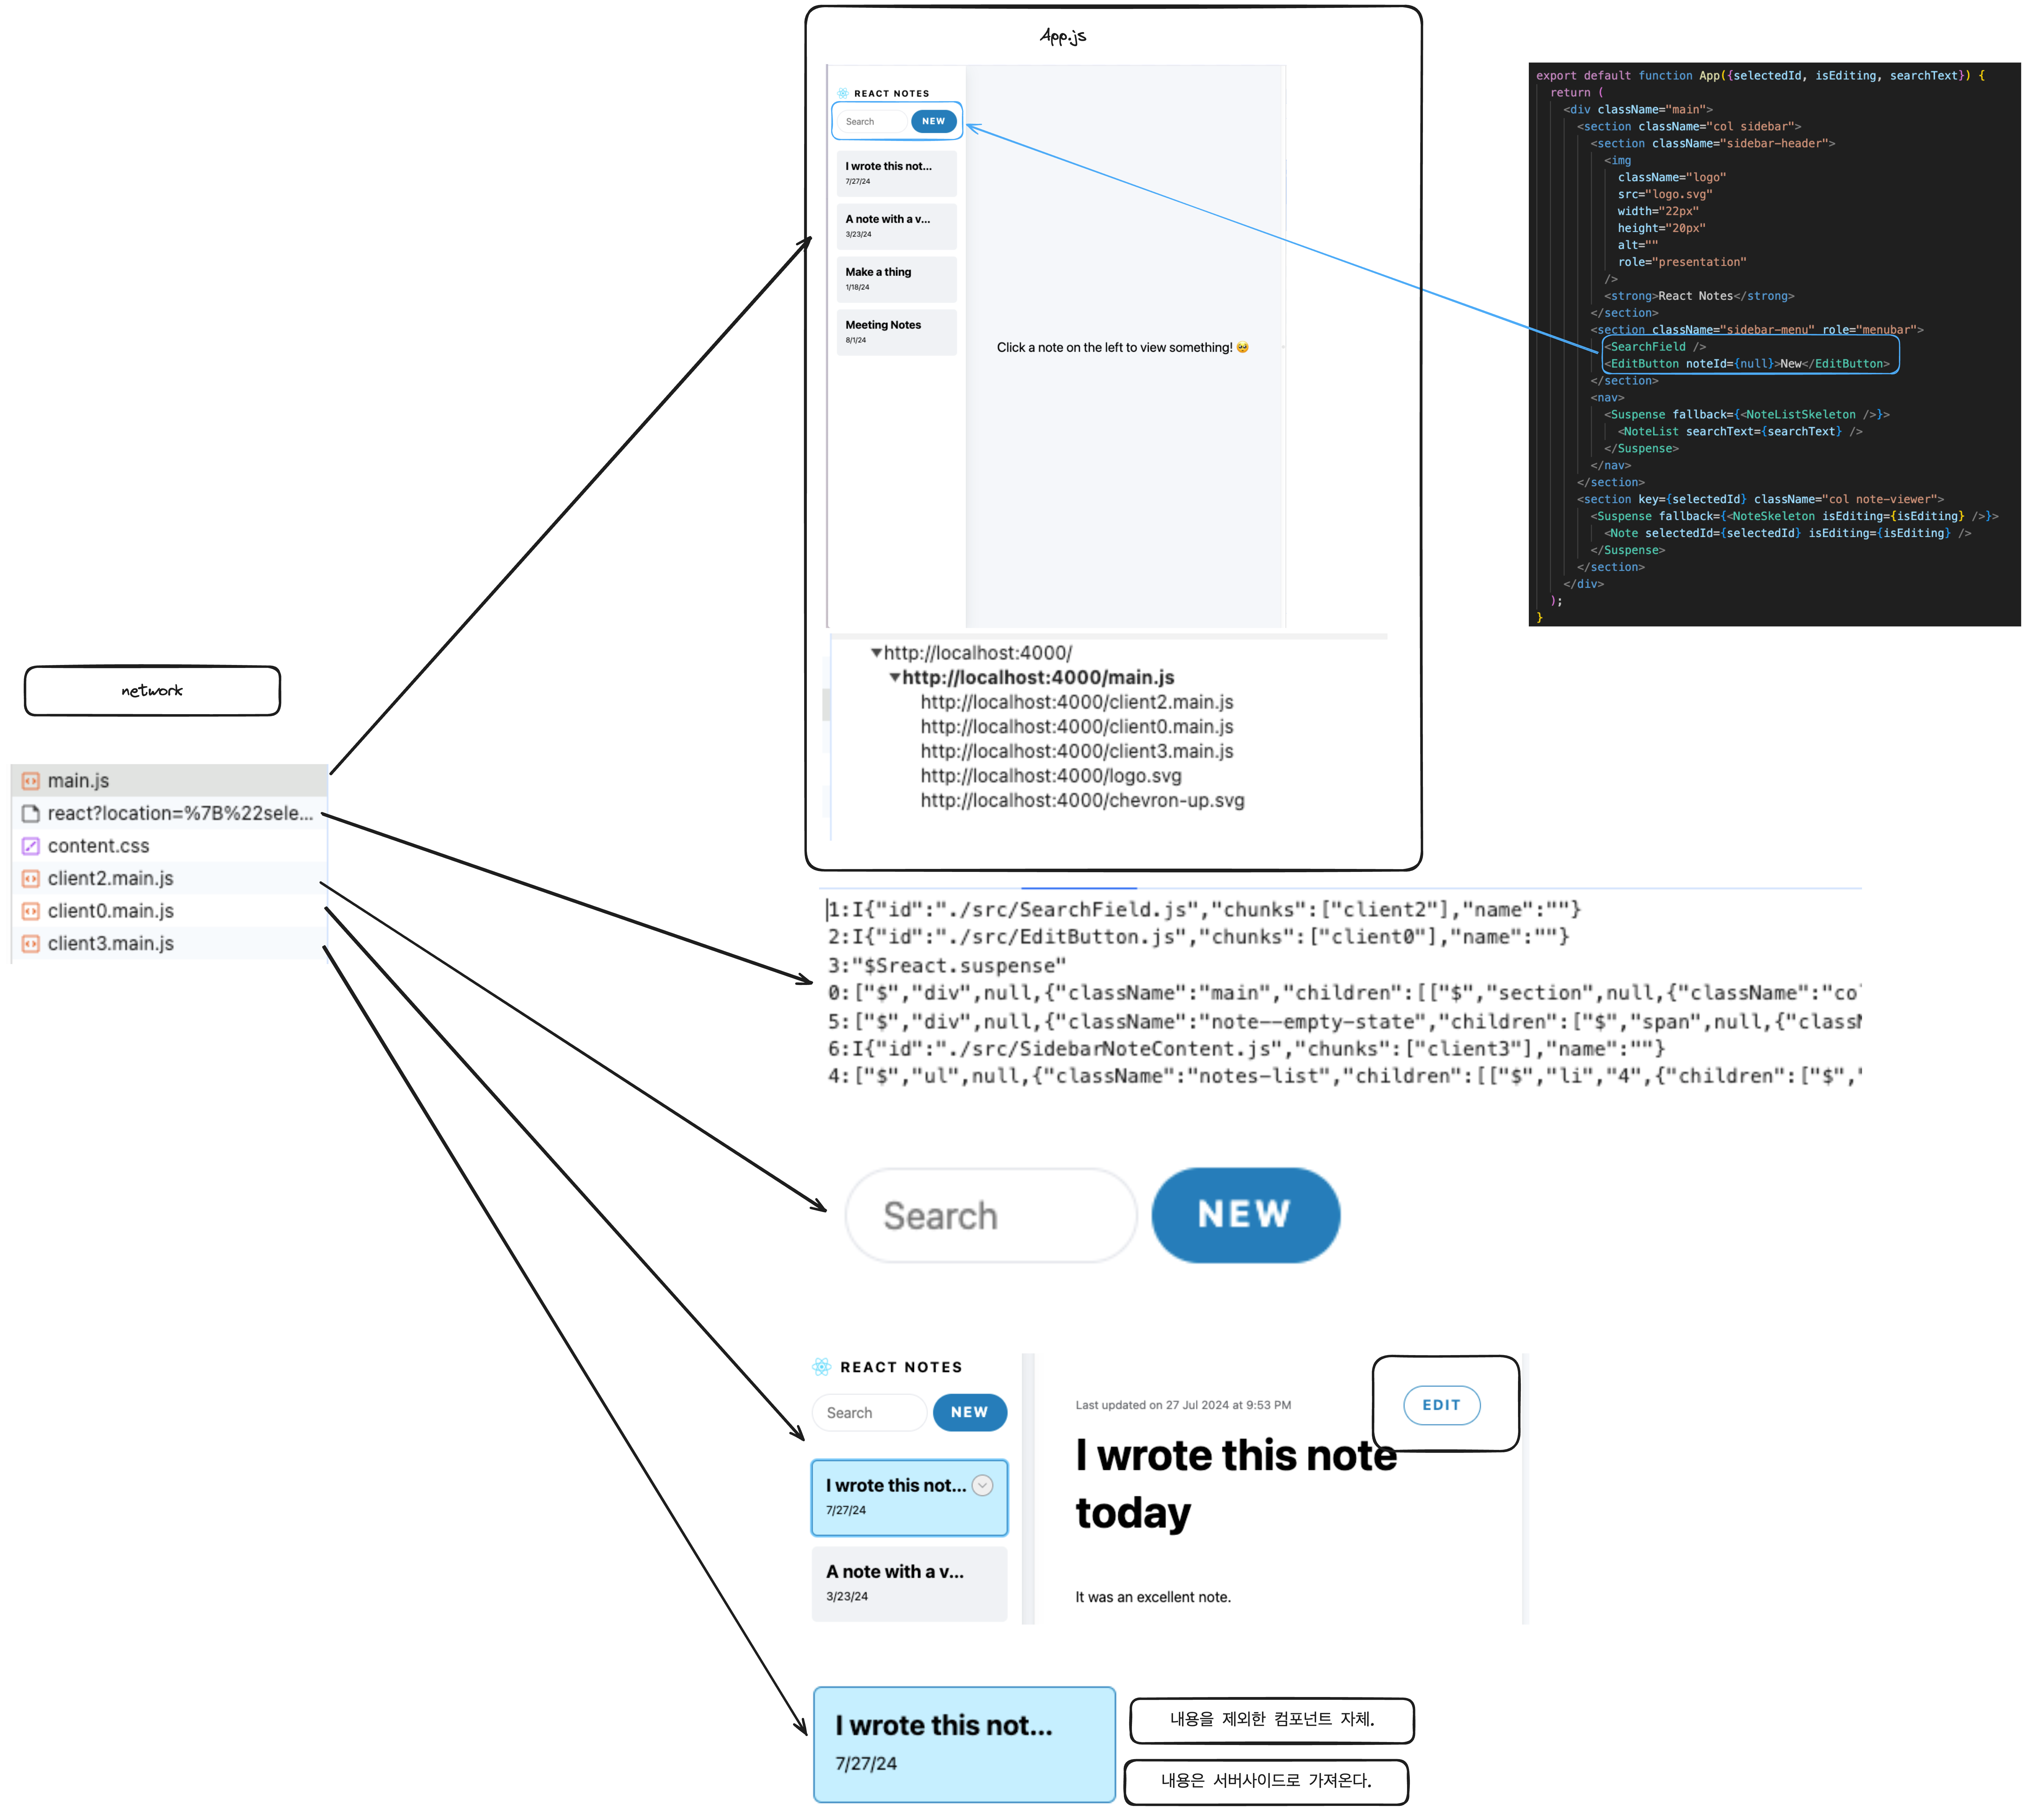
App.js
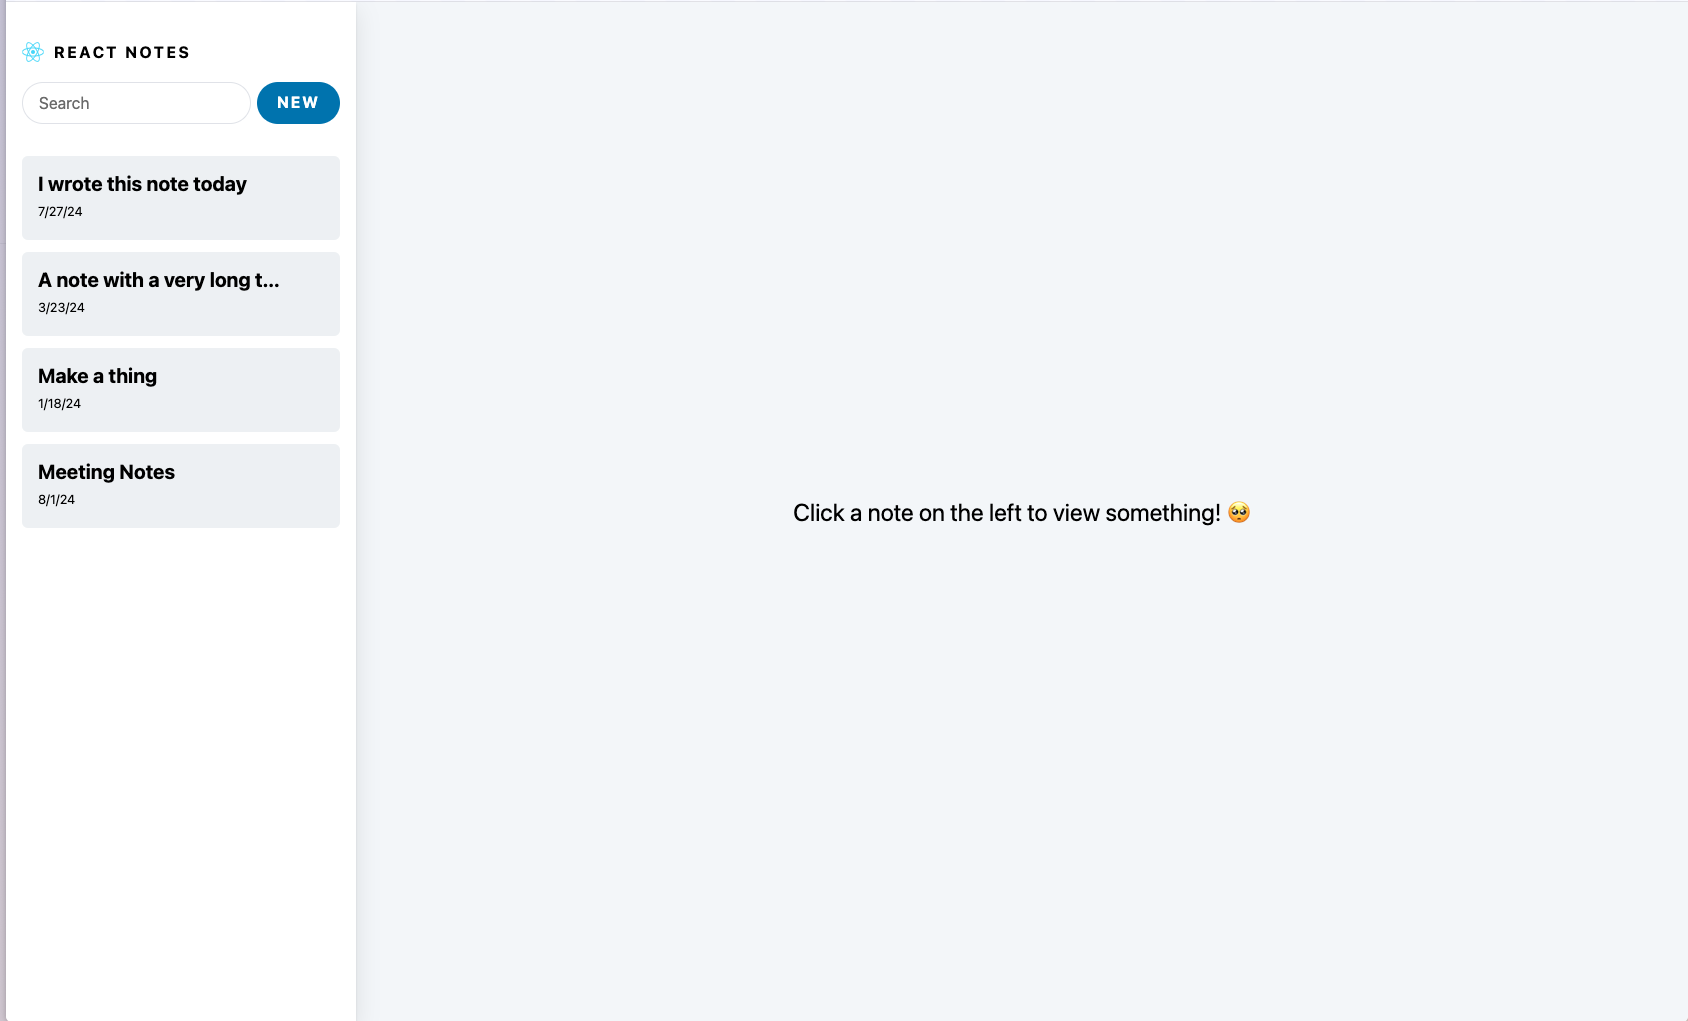
위의 페이지는 NextJS에서 제공하는 ServerComponent demo 사이트입니다. 당연히 클라이언트 컴포넌트도 존재하고 해당 컴포넌트의 렌더링을 보면 다음과 같습니다.
처음 홈페이지에 접속할 경우 네트워크입니다.
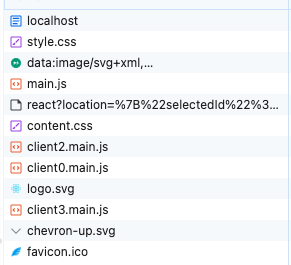
처음부터 다운 받는 JS파일은 다음과 같습니다.
- main.js
- client2.main.js
- client0.main.js
- client3.main.js
client.main.js의 경우 말그대로 클라이언트 컴포넌트입니다.
홈페이지에 접속할 시 바로 네트워크를 통해 다운받는 것을 볼 수 있습니다.
💡 Client Component를 사용하기 위해서는 'use client’를 선언해야합니다.
Server Component의 동작
그럼 서버컴포넌트는 어떻게 동작할까요?
- Next Server에서 컴포넌트를 관리합니다.
- Next Server에 컴포넌트 요청시 API 혹은 DB query를 호출하여 컴포넌트를 완성합니다.
- 완성된 컴포넌트를 unrapJSX 메소드를 사용하여 React Tree로 만듭니다.
- React Tree를 renderToSting과 같은 메소를 사용하여 html 문자열로 변경합니다.
- Client에게 해당 문자열을 송출합니다.
- Client는 문자열을 받고 RSC Parcer를 통해 파싱 후 사용합니다.
해당 동작은 demo사이트의 동작으로 실제와 조금 다를 수 있습다.
단순한 예를 통해 확인해보겠습니다.
Server
app.get("/page", async (req, res) => {
  const Component = (
    await import(join(process.cwd(), "dist", "pages", req.query.page))
  ).default;
  const props = req.query;

  const jsx = await unwrapJsx(
    <Layout bgColor="white">
      <Component {...props} />
    </Layout>
  );

  const html = renderToString(jsx);

  res.send(html);
});-
Page 요청이 들어옵니다.
-
해당 Page에 맞는 Server Component를 동적으로 가져옵니다.
const Component = ( await import(join(process.cwd(), "dist", "pages", req.query.page))join(process.cwd():dist/pages/req.query.page: home? about ? page 이름- 조합할 경우 :
dist/pages/home.js,dist/pages/about.js.
-
React Tree 형태로 변환합니다.
const jsx = await unwrapJsx;- ex)
const el = {
  $$typeof: Symbol.for("react.element"),
  type: async () => "html",
  props: {
    children: {
      $$typeof: Symbol.for("react.element"),
      type: async () => "head",
      props: {
        children: {
          $$typeof: Symbol.for("react.element"),
          type: async () => "p",
          props: {
            children: async () => "hello",
          },
        },
      },
    },
  },
};
- ex)
-
React Tree를 string으로 변환합니다.
const html = renderToString(jsx);- 클라이언트에게 송출합니다.
Client
client의 경우 string 데이터를 받습니다.
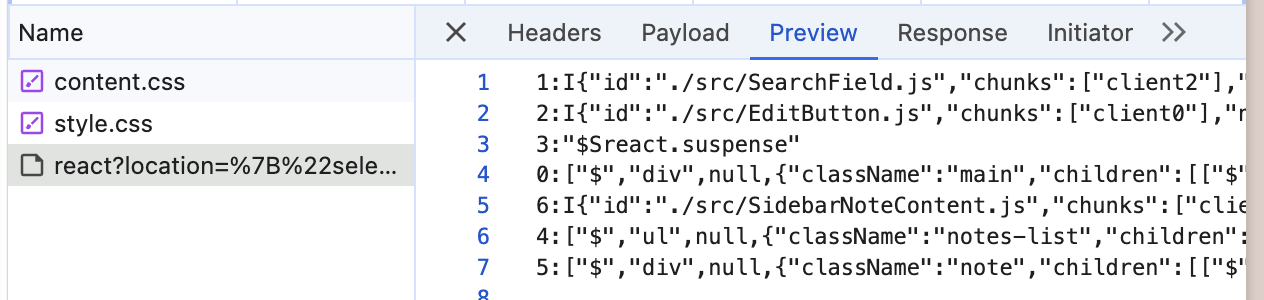
이 데이터를 ‘wire fotmat’ 이라 부릅니다.
wire fotmat을 자세히 보면 두가지 경우가 있습니다.
- ‘I’로 시작하는객체
- 일반 배열
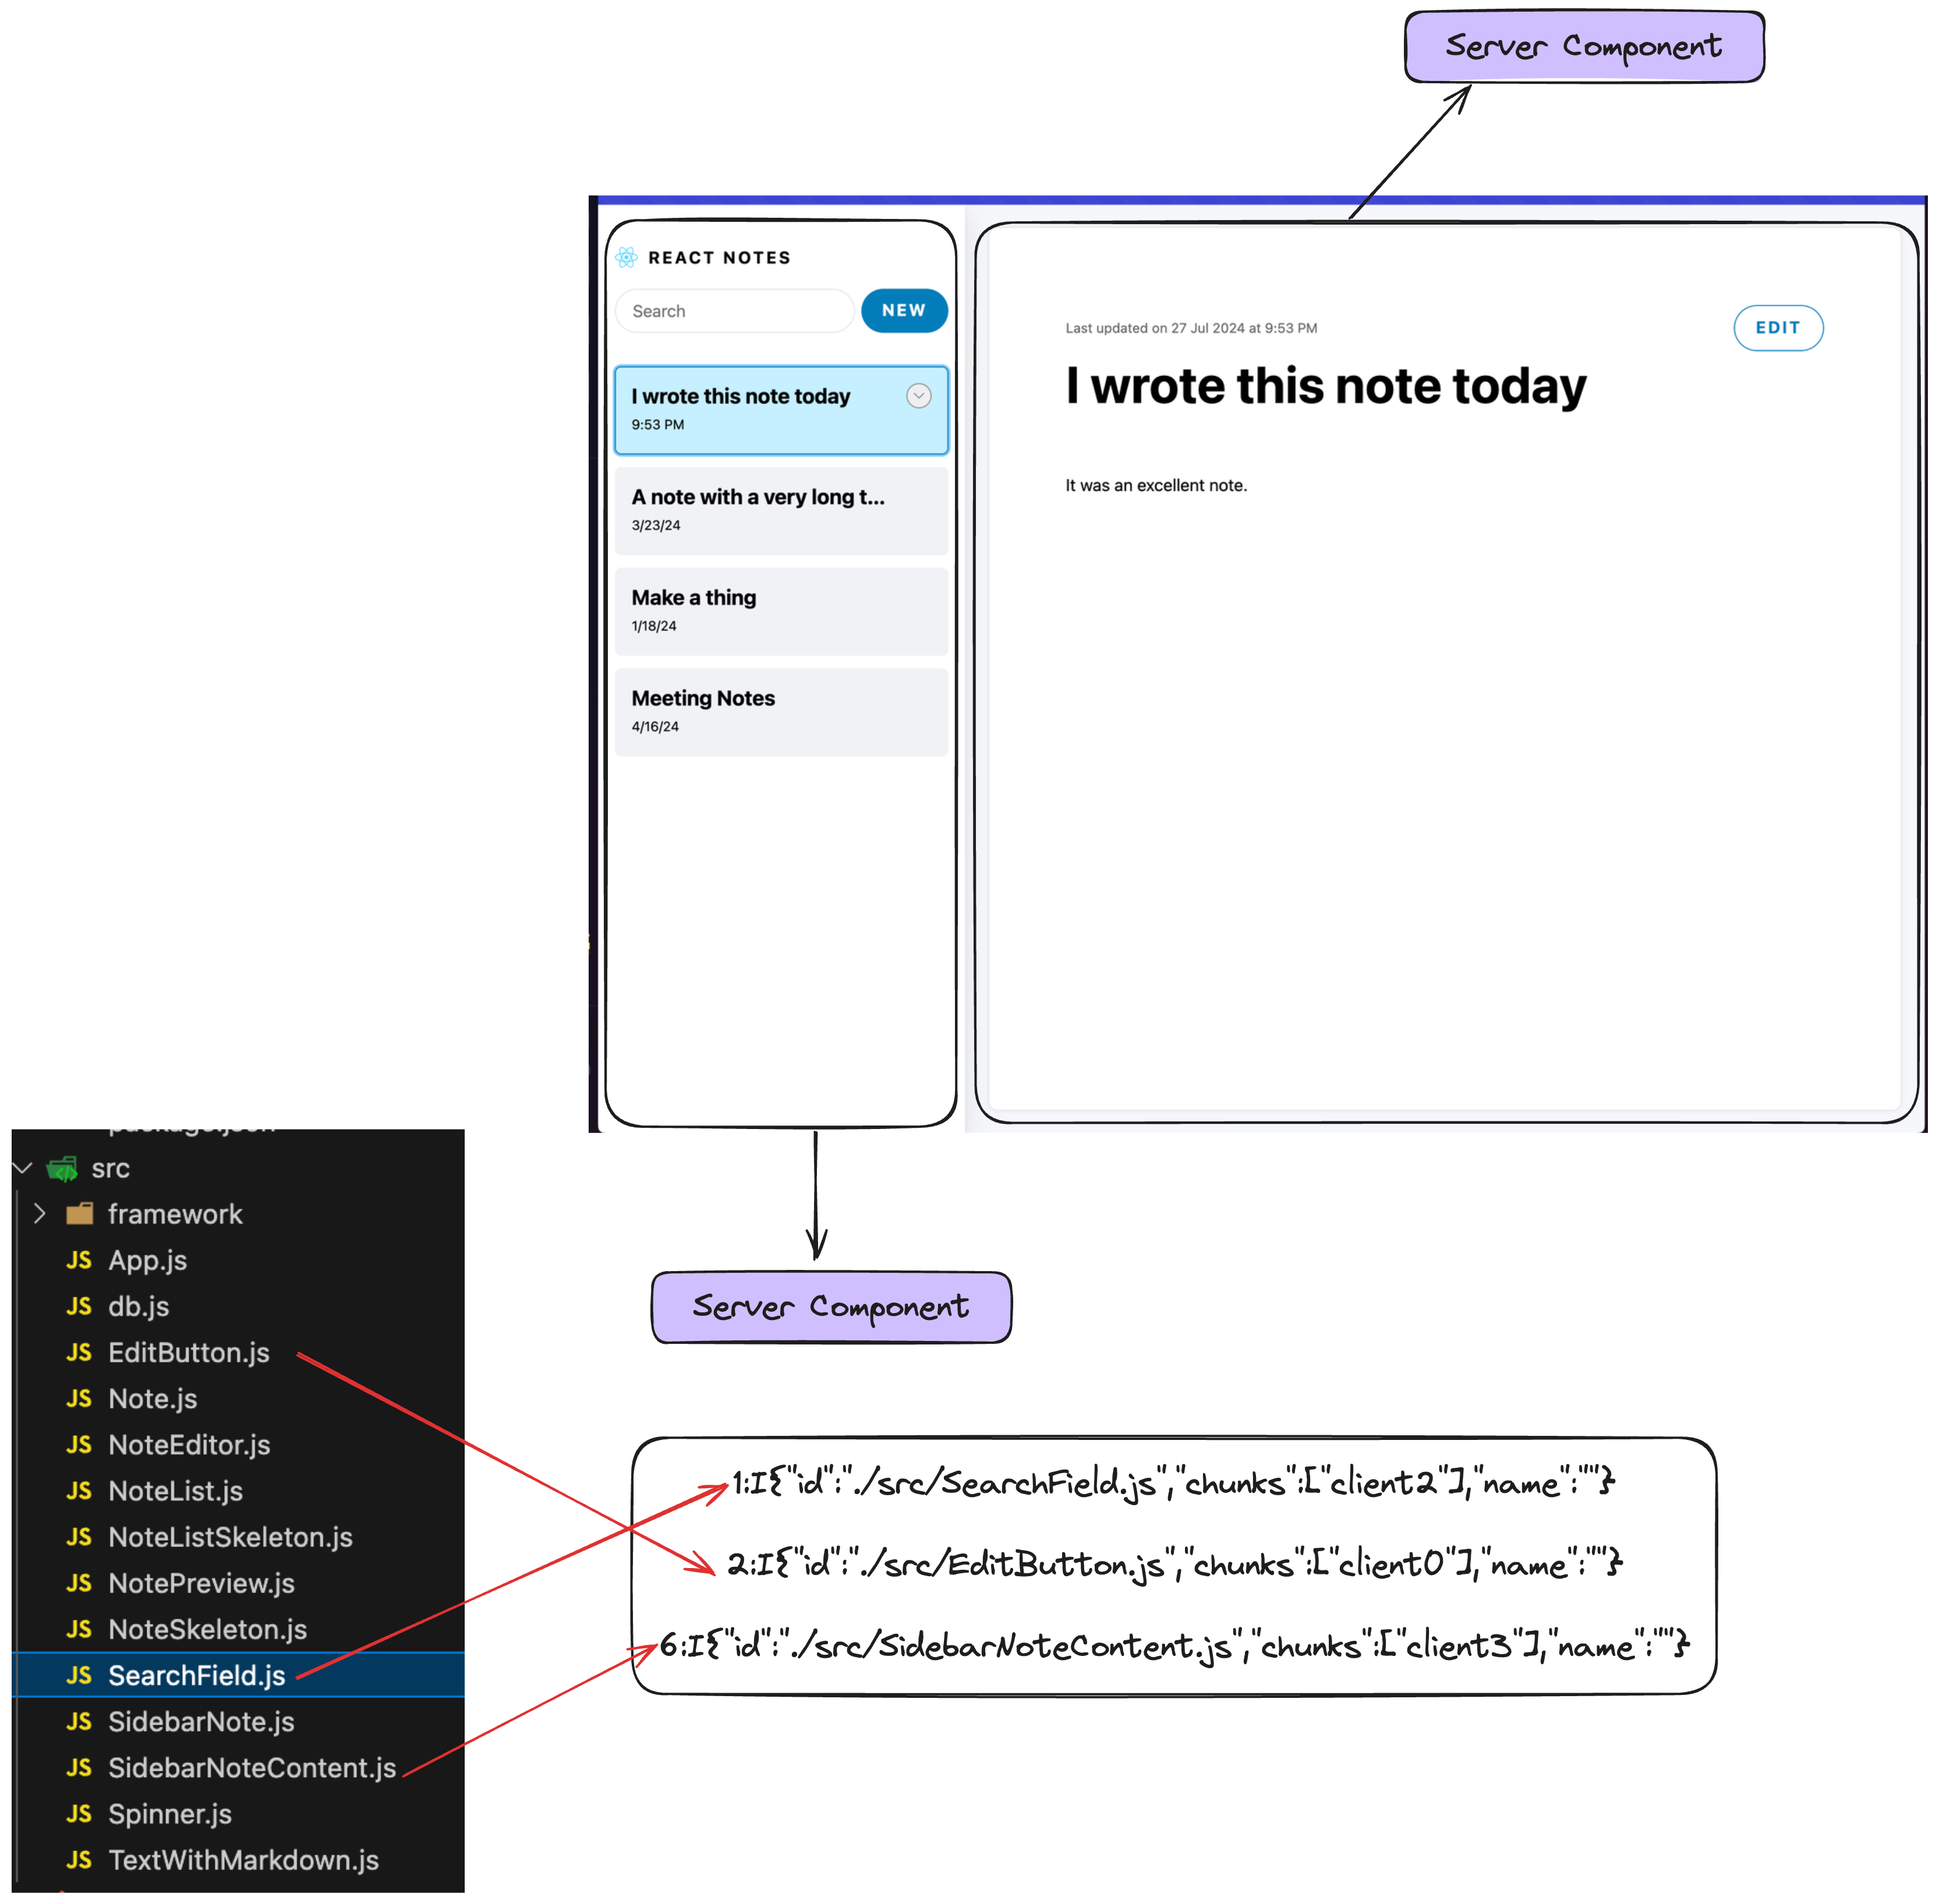
I의 경우 Clien Component 입니다. 위에서 언급한 client.js가 모두 여기 포함됩니다.
1:I{"id":"./src/SearchField.js","chunks":["client2"],"name":""}
2:I{"id":"./src/EditButton.js","chunks":["client0"],"name":""}
6:I{"id":"./src/SidebarNoteContent.js","chunks":["client3"],"name":""}
일반 배열의 경우 Server Component를 문자열형태로 보낸 값입니다.
3:"$Sreact.suspense"
0:["$","div",null,{"className":"main","children":[["$","section",null,{"className":"col sidebar","children":[["$","section",null,{"className":"sidebar-header","children":[["$","img",null,{"className":"logo","src":"logo.svg","width":"22px","height":"20px","alt":"","role":"presentation"}],["$","strong",null,{"children":"React Notes"}]]}],["$","section",null,{"className":"sidebar-menu","role":"menubar","children":[["$","$L1",null,{}],["$","$L2",null,{"noteId":null,"children":"New"}]]}],["$","nav",null,{"children":["$","$3",null,{"fallback":["$","div",null,{"children":["$","ul",null,{"className":"notes-list skeleton-container","children":[["$","li",null,{"className":"v-stack","children":["$","div",null,{"className":"sidebar-note-list-item skeleton","style":{"height":"5em"}}]}],["$","li",null,{"className":"v-stack","children":["$","div",null,{"className":"sidebar-note-list-item skeleton","style":{"height":"5em"}}]}],["$","li",null,{"className":"v-stack","children":["$","div",null,{"className":"sidebar-note-list-item skeleton","style":{"height":"5em"}}]}]]}]}],"children":"$L4"}]}]]}],["$","section","null",{"className":"col note-viewer","children":["$","$3",null,{"fallback":["$","div",null,{"className":"note skeleton-container","role":"progressbar","aria-busy":"true","children":[["$","div",null,{"className":"note-header","children":[["$","div",null,{"className":"note-title skeleton","style":{"height":"3rem","width":"65%","marginInline":"12px 1em"}}],["$","div",null,{"className":"skeleton skeleton--button","style":{"width":"8em","height":"2.5em"}}]]}],["$","div",null,{"className":"note-preview","children":[["$","div",null,{"className":"skeleton v-stack","style":{"height":"1.5em"}}],["$","div",null,{"className":"skeleton v-stack","style":{"height":"1.5em"}}],["$","div",null,{"className":"skeleton v-stack","style":{"height":"1.5em"}}],["$","div",null,{"className":"skeleton v-stack","style":{"height":"1.5em"}}],["$","div",null,{"className":"skeleton v-stack","style":{"height":"1.5em"}}]]}]]}],"children":"$L5"}]}]]}]
5:["$","div",null,{"className":"note--empty-state","children":["$","span",null,{"className":"note-text--empty-state","children":"Click a note on the left to view something! 🥺"}]}]
4:["$","ul",null,{"className":"notes-list","children":[["$","li","4",{"children":["$","$L6",null,{"id":4,"title":"I wrote this note today","expandedChildren":["$","p",null,{"className":"sidebar-note-excerpt","children":"It was an excellent note."}],"children":["$","header",null,{"className":"sidebar-note-header","children":[["$","strong",null,{"children":"I wrote this note today"}],["$","small",null,{"children":"9:53 PM"}]]}]}]}],["$","li","3",{"children":["$","$L6",null,{"id":3,"title":"A note with a very long title because sometimes you need more words","expandedChildren":["$","p",null,{"className":"sidebar-note-excerpt","children":"You can write all kinds of amazing notes in this app! These note live on the server in the notes..."}],"children":["$","header",null,{"className":"sidebar-note-header","children":[["$","strong",null,{"children":"A note with a very long title because sometimes you need more words"}],["$","small",null,{"children":"3/23/24"}]]}]}]}],["$","li","2",{"children":["$","$L6",null,{"id":2,"title":"Make a thing","expandedChildren":["$","p",null,{"className":"sidebar-note-excerpt","children":"It's very easy to make some words bold and other words italic with Markdown. You can even link to React's..."}],"children":["$","header",null,{"className":"sidebar-note-header","children":[["$","strong",null,{"children":"Make a thing"}],["$","small",null,{"children":"1/18/24"}]]}]}]}],["$","li","1",{"children":["$","$L6",null,{"id":1,"title":"Meeting Notes","expandedChildren":["$","p",null,{"className":"sidebar-note-excerpt","children":"This is an example note. It contains Markdown!"}],"children":["$","header",null,{"className":"sidebar-note-header","children":[["$","strong",null,{"children":"Meeting Notes"}],["$","small",null,{"children":"4/16/24"}]]}]}]}]]}]
0 : 메인 페이지입니다. AppRouter를 사용하기 때문에 RSC가 맞습니다.
5 : sidebar의 노트 리스트
4 : 노트

parser를 이용하여 간단히 APP.js를 확인해보면 다음과 같습니다.
0 ⇒ APP.js
export default function App({ selectedId, isEditing, searchText }) {
  return (
    <div className="main">
      <section className="col sidebar">
        <section className="sidebar-header">
          <img
            className="logo"
            src="logo.svg"
            width="22px"
            height="20px"
            alt=""
            role="presentation"
          />
          <strong>React Notes</strong>
        </section>
        <section className="sidebar-menu" role="menubar">
          <SearchField />
          <EditButton noteId={null}>New</EditButton>
        </section>
        <nav>
          <Suspense fallback={<NoteListSkeleton />}>
            <NoteList searchText={searchText} />
          </Suspense>
        </nav>
      </section>
      <section key={selectedId} className="col note-viewer">
        <Suspense fallback={<NoteSkeleton isEditing={isEditing} />}>
          <Note selectedId={selectedId} isEditing={isEditing} />
        </Suspense>
      </section>
    </div>
  );
}
출처 : https://rsc-parser.vercel.app/
이로 인해 우리는 Client Component와 Server Component를 어떻게 사용하는지 알게 되었습니다.
하지만 저에게는 아직 부족한 무언가가 있었습니다. 그것은 서버에 대한 이해도가 부족해서 일 수도 있습니다.
‘클라이언트가 무엇을 가지고 있고 서버는 무엇을 가지고있지? 최종적으로 어디서 불러오는 것일까?’
이 의문의 해결해준 설명이 바로 File System과 Module Map입니다.
NextJS Module Map
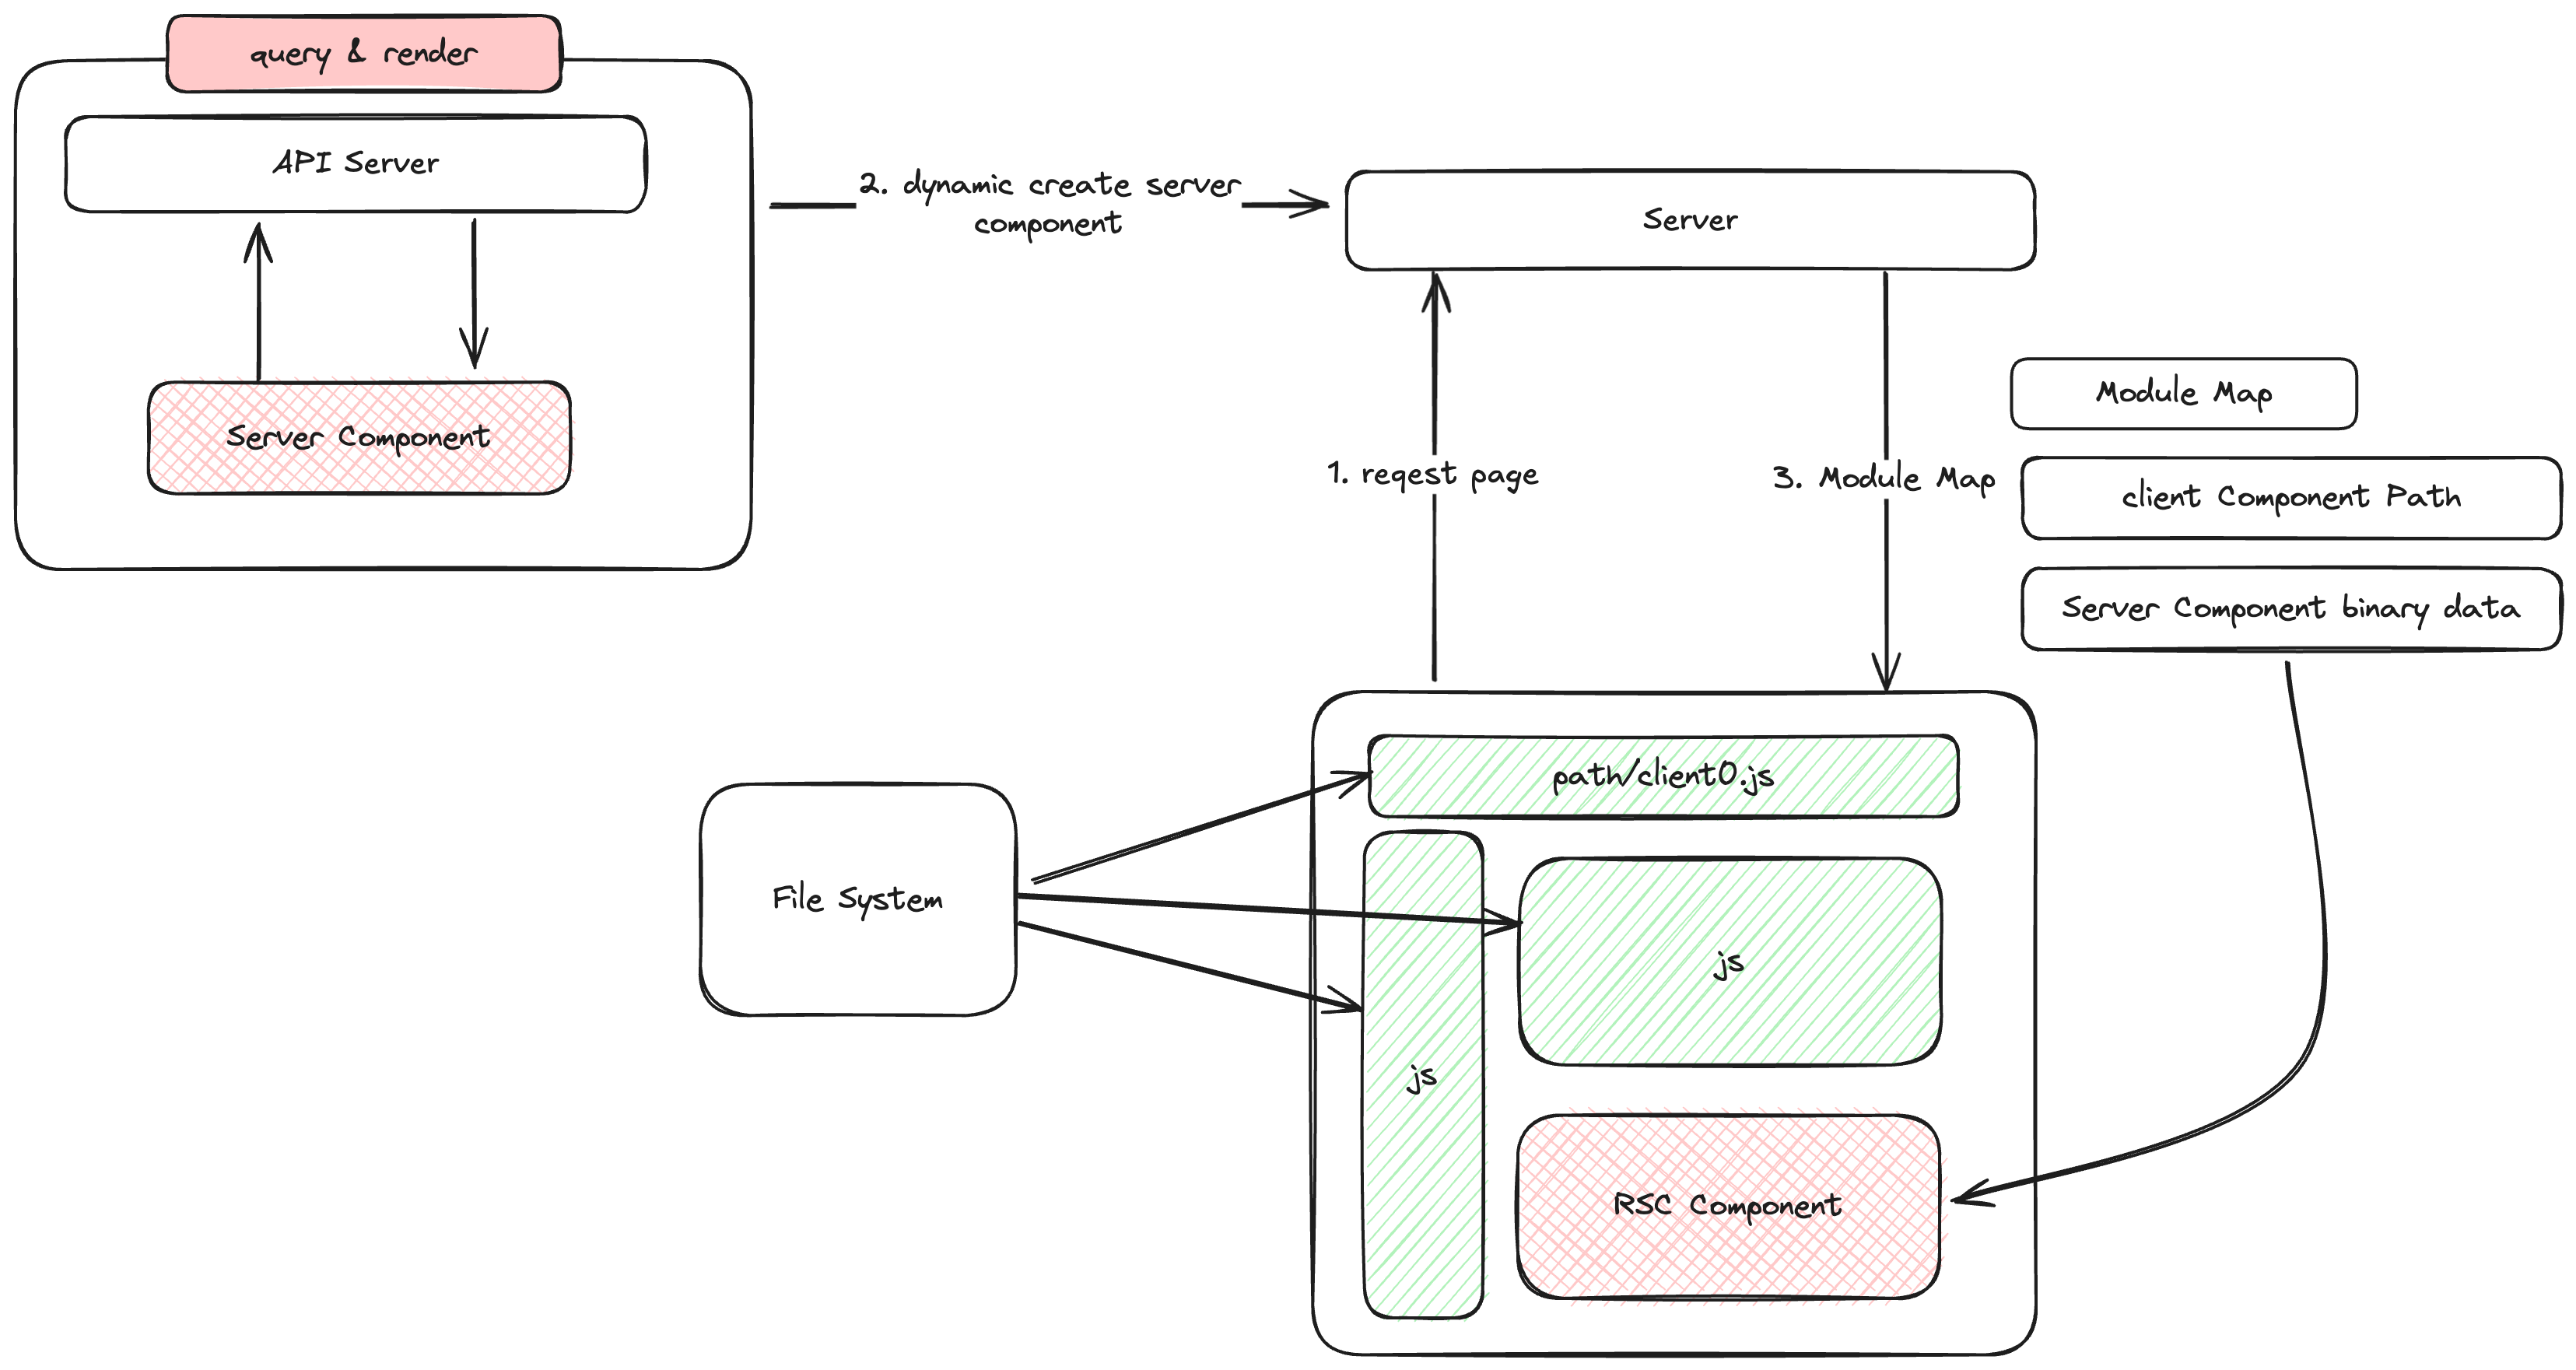
모듈맵을 생성하는 과정은 다음과 같습니다.
- File System을 이용하여 컴포넌트 모듈맵을 만듭니다.
- 모듈맵은 Server에서 관리하며 모듈맵에 따라서 Client에게 페이지 정보를 줍니다.
- Client의 경우 모듈맵을 보고 페이지를 불러옵니다.
계속 봐왔던 이것이 모듈맵입니다.
1:I{"id":"./src/SearchField.js","chunks":["client2"],"name":""}
2:I{"id":"./src/EditButton.js","chunks":["client0"],"name":""}
3:"$Sreact.suspense"
0:["$","div",null,{"className":"main","children":[["$","section",null,{"className":"col sidebar","children":[["$","section",null,{"className":"sidebar-header","children":[["$","img",null,{"className":"logo","src":"logo.svg","width":"22px","height":"20px","alt":"","role":"presentation"}],["$","strong",null,{"children":"React Notes"}]]}],["$","section",null,{"className":"sidebar-menu","role":"menubar","children":[["$","$L1",null,{}],["$","$L2",null,{"noteId":null,"children":"New"}]]}],["$","nav",null,{"children":["$","$3",null,{"fallback":["$","div",null,{"children":["$","ul",null,{"className":"notes-list skeleton-container","children":[["$","li",null,{"className":"v-stack","children":["$","div",null,{"className":"sidebar-note-list-item skeleton","style":{"height":"5em"}}]}],["$","li",null,{"className":"v-stack","children":["$","div",null,{"className":"sidebar-note-list-item skeleton","style":{"height":"5em"}}]}],["$","li",null,{"className":"v-stack","children":["$","div",null,{"className":"sidebar-note-list-item skeleton","style":{"height":"5em"}}]}]]}]}],"children":"$L4"}]}]]}],["$","section","null",{"className":"col note-viewer","children":["$","$3",null,{"fallback":["$","div",null,{"className":"note skeleton-container","role":"progressbar","aria-busy":"true","children":[["$","div",null,{"className":"note-header","children":[["$","div",null,{"className":"note-title skeleton","style":{"height":"3rem","width":"65%","marginInline":"12px 1em"}}],["$","div",null,{"className":"skeleton skeleton--button","style":{"width":"8em","height":"2.5em"}}]]}],["$","div",null,{"className":"note-preview","children":[["$","div",null,{"className":"skeleton v-stack","style":{"height":"1.5em"}}],["$","div",null,{"className":"skeleton v-stack","style":{"height":"1.5em"}}],["$","div",null,{"className":"skeleton v-stack","style":{"height":"1.5em"}}],["$","div",null,{"className":"skeleton v-stack","style":{"height":"1.5em"}}],["$","div",null,{"className":"skeleton v-stack","style":{"height":"1.5em"}}]]}]]}],"children":"$L5"}]}]]}]
5:["$","div",null,{"className":"note--empty-state","children":["$","span",null,{"className":"note-text--empty-state","children":"Click a note on the left to view something! 🥺"}]}]
6:I{"id":"./src/SidebarNoteContent.js","chunks":["client3"],"name":""}
4:["$","ul",null,{"className":"notes-list","children":[["$","li","4",{"children":["$","$L6",null,{"id":4,"title":"I wrote this note today","expandedChildren":["$","p",null,{"className":"sidebar-note-excerpt","children":"It was an excellent note."}],"children":["$","header",null,{"className":"sidebar-note-header","children":[["$","strong",null,{"children":"I wrote this note today"}],["$","small",null,{"children":"7/27/24"}]]}]}]}],["$","li","3",{"children":["$","$L6",null,{"id":3,"title":"A note with a very long title because sometimes you need more words","expandedChildren":["$","p",null,{"className":"sidebar-note-excerpt","children":"You can write all kinds of amazing notes in this app! These note live on the server in the notes..."}],"children":["$","header",null,{"className":"sidebar-note-header","children":[["$","strong",null,{"children":"A note with a very long title because sometimes you need more words"}],["$","small",null,{"children":"3/23/24"}]]}]}]}],["$","li","2",{"children":["$","$L6",null,{"id":2,"title":"Make a thing","expandedChildren":["$","p",null,{"className":"sidebar-note-excerpt","children":"It's very easy to make some words bold and other words italic with Markdown. You can even link to React's..."}],"children":["$","header",null,{"className":"sidebar-note-header","children":[["$","strong",null,{"children":"Make a thing"}],["$","small",null,{"children":"1/18/24"}]]}]}]}],["$","li","1",{"children":["$","$L6",null,{"id":1,"title":"Meeting Notes","expandedChildren":["$","p",null,{"className":"sidebar-note-excerpt","children":"This is an example note. It contains Markdown!sdffd"}],"children":["$","header",null,{"className":"sidebar-note-header","children":[["$","strong",null,{"children":"Meeting Notes"}],["$","small",null,{"children":"8/1/24"}]]}]}]}]]}]
NextJS의 경우 가장 처음 모듈맵을 먼저 만들어서 어떤 것이 RSC인지 RCC인지 구분하고 RCC의 경우 컴포넌트 주소를 주고 RSC의 경우 React Tree를 주었습니다.
Client의 경우 모듈맵을 받고 해당 맵을 보고 컴포넌트만 띄워주는 것입니다.
RSC를 꼭 써야할까?
개인적인 견해로는 사용할 수 밖에 없다. 라는 생각입니다.
RSC를 사용할 경우 렌더링의 장점도 있겠지만 더욱 강력한 장점은 바로 client가 binary데이터로 컴포넌트를 받는다. 라는 것입니다.
즉 컴포넌트를 client가 가지지 않아도 되고 다른 의미로는 컴포넌트에서 사용하는 라이브러리, 프레임워크를 다운받지 않아도 된다는 것을 의미합니다.
결론은 유저가 다운받아야하는 웹의 총량이 줄어드는 것입니다.